Pages

Sunday, June 30, 2013

My Nails are in Rhodes!


Hey y'all it's Lisl!  Posting from my phone so this will be quick and likely filled with grammatical errors.  Anyway, I'm traveling through Greece after a conference and am doing a test run on some Incoco nail appliqués that I got in a Birchbox a couple months ago.  I thought they'd be good for travel- they were quite easy to apply though I wish I had some acetone to clean up the edges. 

Anyway.  I took my nails to Lindos yesterday, where I missed the acropolis there (it closes early on Saturdays apparently), so we were forced into lying on the beach and reading a book.


Today my nails and I went SCUBA diving.  I've noticed before that soaking in salt water for 2 hours does not help a manicure's longevity and I did have some chippage (it's day 2 after application) but I'm pretty sure that issue has nothing to do with the appliqués.

Here are my nails and I sunbathing on the boat!


Anyway, tomorrow I will wander around Rhodes properly and then off to Athens!  I'll be reporting back soon!

Friday, June 28, 2013

Cover Girl Outlast Stay Brilliant Glosstini Review & Swatches


Arden here!  In my very first post on Casa de Polish I swatched a couple of Cover Girl's Outlast Stay Brilliatn nail polishes, and now they're back!  Cover Girl has just released a bunch of new summery shades in these cute smaller bottles they call "glosstinis."  I have long been a fan of miniature versions of items, so these mini bottles of polish called my name as soon as I spotted them.  I ended up getting four colors to try: Pink Lady (#500), Lemon Drop (#525), Blue Hawaiian (#535), and Purple Freeze (#540).  (Cover Girl still insists on not listing the name of the polish on the bottle, just the number.)


First up is Pink Lady, two coats plus top coat.  I will admit that this is probably my least favorite of the shades I bought, but I also am not a big fan of pink polishes.  It is a lovely light pink shade, and I didn't own anything like it (again, because I rarely buy pink polish), but on my nails it didn't really pop out at me as much as I'd hoped.


Next is Lemon Drop.  I really like this polish-- it's a shade lighter than the other yellows I own, but it's still plenty bright and summery.  It also had good coverage-- this is only two coats plus top coat.  The one downside to this polish is that it stained my skin when I took it off with acetone.  You can tell in the next picture how my knuckles kind of have a yellowish tint to them.  I'm sure I could have scrubbed harder with acetone to remove it all, but this is usually not as bad a problem with other polishes.

Monday, June 24, 2013

Splatter Paint Nails Tutorial


Arden here!  Did anybody else's family do a lot of splatter painting when they were younger?  Maybe it was just me, but I definitely had several articles of clothing that featured some home-made splatter paint when I was in elementary school.  Today's manicure brought back all that 90's awesomeness!

I had been looking to do some really colorful nails, and my original plan was to try a rainbow pattern.  But the more I thought about it, the more tedious, time-consuming, and un-fun painting on a gazillion rainbow stripes sounded.  So I decided to go in another, infinitely more fun direction.  And I'm so glad I did, because this is by far my favorite manicure I've given myself yet!

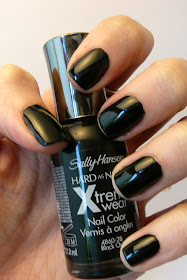
I started by painting my nails with two coats of Sally Hansen Black Out.


I then started splatter painting!  All you really need to do this technique is a straw.  I did not have a full-sized drinking straw, so I used a little red coffee stirrer straw.  I do think that no matter the diameter of your straw, it probably helps to cut them down so they're shorter.  I ended up cutting each coffee stirrer in thirds.

Next, make a little puddle of the nail polish you want to splatter on a paper plate/wax paper/Ziploc baggie/whatever water-resistant surface you want.  Dip one end of the straw in the nail polish.  Then hold it over your nail, and blow into the other end of the straw.  (Be careful not to inhale the polish!)

It will probably take you a couple of tries to work out all of the kinks.  Here I am practicing on wax paper.  As you can tell, the nail polish didn't so much splatter out of the straw as drip down.  (But that one in the lower left corner looks good!)


I found that blowing a quick sharp breath helped.  Also, it worked better for me when I made a tah sound as I blew, instead of a wah.

Here are my nails after I finished my first color.  They weren't too impressive.

Yeah, that's right, the pinky and pointer finger basically only have small drops on them.

Friday, June 21, 2013

Zooey Deschanel Stripy Nails


Arden:  We are BIG New Girl fans here at the Casa de Polish.  It's probably the one show that we DVR and watch multiple times throughout the week.  And coincidentally enough, its star, Zooey Deschanel, is pretty well known for her fabulous manicures.  She got a little camera and film strip painted on for the Golden Globes last year, and teeny tiny televisions for the Emmys.  While most of those are too ambitious for me to try out right now, I was browsing the internet a few days ago and found this picture that Zooey Deschanel posted a while ago and thought, "I could do those!"

from http://instagram.com/p/J7Fkk_Ljl_/
I started by painting my nails with two coats of Zoya Wednesday.  I started by dipping the striper brush from our Mash nail brush set in both Essie Mint Candy Apple and OPI Did It On 'Em and then making little X's in both of those colors.  I finished by adding a few more stripes using our gold and silver Color Club striper polishes.  I finished with a top coat of Sally Hansen Insta-Dri Anti-Chip Top Coat because Essie Good to Go doesn't work well with Zoya polishes (a phenomenon that I will some day devote an entire post to).


Wednesday, June 19, 2013

Star Trek Nails


Arden: I just discovered these pictures on my computer and can't believe I never blogged them!  To celebrate going to see Star Trek Into Darkness at midnight the night it opened last month, I did a Star Trek-inspired manicure.  These nails are meant to evoke the uniforms worn by Starfleet officers.


I started by painting my nails Essie Red Label, Butter London Blagger, and Sally Hansen Butterscotch.  (I bought Butterscotch because I had a coupon at CVS, and also because I had never seen a mustard yellow polish before.  It really is a unique shade of yellow.)

Tuesday, June 18, 2013

As Seen on Pinterest: Nautical Nails


Arden: We haven't done one of these in a while!  I guess I've been getting my nail inspiration from places other than Pinterest.  Today I recreated this design, which I pinned many moons ago:

from http://thebeautydepartment.com/2012/01/mani-monday/

I didn't have any of those straight across manicure strips to make the white lines with, so I decided to just use regular Scotch tape.  This did NOT work as well as I thought.  It was a major struggle to cut the tape narrow enough to fit a couple of white stripes on my nails without it being too narrow or crooked.


I started my painting my nails with two coats of OPI My Boyfriend Scales Walls.  After it dried, I applied the tape and painted on a thick coat of Chanel Blue Satin.  (In retrospect, I should've chosen a different navy blue-- that one looked practically black, even over the white.)  And then I finished up by drawing on tiny hearts with our Color Club red striper polish.


This manicure really wasn't executed well.  The navy polish bled onto the white really badly (you can tell on my ring finger where I had to cover it up with white polish) and in these close up pictures it's pretty obvious none of the stripes are straight.

Oh well, you live, you learn.  Chalk this one up as a "manicure I'll never do again and would advise you not to try either!"

Monday, June 17, 2013

Sally Hansen Sugar Coat Review & Swatch


Arden: We're suddenly trying out new products left and right here at the Casa de Polish!  Today we have one of Sally Hansen's new Sugar Coat polishes.  These are being marketed right along side the new Sally Hansen Fuzzy Coats, which we swatched here. This was the first texture coat I've ever tried (other versions include OPI Liquid Sand and Zoya PixieDust) and I didn't really know quite what to expect. 

I'd always assumed before that these kinds of polishes contained some sort of special chemicals that bubbled up as the dried, but it turns out that there's actually some kind of grit in the polish in the bottle.  It applies just like normal, but then other things in the polish evaporate as it dries, leaving a rough texture.


This is Sally Hansen Sugar Coat Sour Apple, two coats, no top coat.  The sugar coats come in a variety of colors, but due to our love of greens, we opted to get the mint green one first to try out and see how we liked it.

I'm not gonna lie, the reason this was the first gritty texture coat I've ever tried is because they never really appealed to me.  "Why would I want gritty nails?" I would ask myself every time I saw an OPI Liquid Sand polish discounted at the local beauty supply store.


Friday, June 14, 2013

Nail Art Nail-Off: Fruit Nails


Interestingly enough, we have now had multiple people suggest to us that we do some fruit-inspired nail art, so today we're both trying our hands at painting fruit on our nails!

Arden:  I decided a bowl of fruit would be my inspiration.  I'd draw a different fruit on four of my nails, and then have them all in a bowl on my thumb.


I started by painting each nail a lighter version of the color of fruit that was going to go on it.  (For the bowl of fruit on my thumb, I used a light blue.)  Then I went through and drew the fruit!

I used a dotting tool to make all of the grapes, and then used a couple of brushes from our new Mash nail brush set to paint on the rest of the fruit.

Here they are in detail:

Friday, June 7, 2013

Sally Hansen Fuzzy Coat Swatches and Review

It's Arden!  A couple of weeks ago I was strolling through Target (which my boyfriend calls my "happy place") and I spotted this new Sally Hansen display:


I was instantly drawn to the fuzzy coats!  Each fuzzy coat is composed of a clear base with one or two different colors of rectangular glitter.  After weighing my options VERY carefully (read: for a very long time), I ended up picking out these three shades:


Thursday, June 6, 2013

Swatches: Julep Mystery Box Haul

Hey y'all! It's Lisl. Today, Arden and I are totally pumped to share our excellent haul of nail polish we got from Julep's May Mystery Box.  We're not subscribed to Julep's Maven boxes (these come once a month), but every once in a while Julep releases a mystery box, and Arden and I jumped at the chance to try out some of their polishes! 

I myself cannot resist a good mystery box; it's like it's your birthday in the mail! What is inside the box? You don't know! It's a mystery! We got the box last week, when Arden was away, so I texted her pictures of what we got, and when she got back we had a "draft" to decide who got which polish. (Basically, we just took turns choosing which polish we wanted).

For my first pick, I chose Dakota, which is a rosey-coppery metallic.


Wednesday, June 5, 2013

Leopard Print Camo Nails


Arden: I've got a crazy nail design for you today!  I just bought a new skirt + cardigan combo in a military green color palette (is there a better word for that color?  forest green? olive green?) and decided I wanted nails to match.

My first thought was to make camo nails, but I wasn't super confident in my ability to recreate camouflage on my nails, so I decided to use some very camo-like colors in a similar pattern that I'd never tried: leopard print.

I started by painting my nails with two coats of OPI Uh-Oh Roll Down the Window (yes, it is actually called that).  I think this shade might have been discontinued, because I bought it in the mark-down bin at my local beauty supply store, so if you love it go searching for it now!  This was my first time trying it out, and I was surprised by how much I loved the luscious forest-y greenness of this polish.


I then used a dotting tool to make uneven splotches all over each nail using Essie Playa del Platinum.


Tuesday, June 4, 2013

I Can't Afford That: Stella McCartney Roseberry Lace Dress + Debut of my Mash Nail Art Brush Set


Aaaah!!!! So much to write about today, guys!  (By the by, this is Lisl, if you can't tell by the fact that I opened with "Aaaah!!!!")  Today I'm writing about my obsession with this amazing, amazeballs (that's right - two different kinds of amaze) Stella McCartney dress, and I am ALSO showing off my new nail art brush set.  Can we handle that many things at once? 


Keep reading to find out if we can handle that many things at once!

Monday, June 3, 2013

Reader Request: Nails with Dots & Dashes


Arden here: This manicure was suggested by one of the high schoolers in my youth group (you know who you are!).  The inspiration came from this manicure on Little Nails.  (I only recently discovered this blog, but I really love her nail art!) 

from http://little-nails.blogspot.com/2012/11/day-15-delicate-print.html
I started by painting my nails with two coats of Zoya Neely.  (This is our newest light green-- isn't it beautiful?)