Showing posts with label Color Club. Show all posts

Friday, April 18, 2014

Easter Egg Nails


Arden: Ok, here's my second try at Easter egg nails, and these were much more successful!  They might be the design I go with on Easter Sunday itself!

I was trying to go for the kinds of Easter eggs my family used to dye-- where you've drawn on designs in white crayon before you dye them, and then the dye leaves them unevenly colored.  Like this:


Using that as my inspiration, here's what I came up with:


How I Did It:
I started my painting each nail white (Sally Hansen White On) and then applied a fast-drying top coat (Essie Good to Go).  Once each nail was dry, I applied tape.  I used both striping tape for the thin lines and washi tape cut using zigzig scissors.  Then I applied several shades of the same color to a makeup sponge, and sponged over the tape.  I immediately removed the tape, and voila!  Easter egg nails!

Left hand pic!  I think my egg designs got better on my left hand, but sadly my hand positioning for pictures with that hand needs some work!
Colors Used (so many!):

Orange/Yellow:
Julep Marjorie
Color Club Ringo & Love Letter

Pink:
Julep Drew & Helen
Color Club Hot Tub

Purple:
Julep Bette, Charlotte, Joanna, & Helen


Blue:
Julep Annie & Joanna
Essie Bouncer, It's Me

Green:
Julep Diana & Shenae
Color Club Double Dare


What do you think?  Have you decided on your Easter manicure yet?  Let me know in the comments!

Wednesday, April 16, 2014

Rainbow Nails inspired by Kesha!

Arden: Hey everyone!  Oh my goodness, I am so excited to share these nails with you.  I was looking for some inspiration, and stumbled across a gallery of pictures from Coachella, and that led me to realize that Kesha currently has some AMAZING rainbow hair:


Full disclosure: I love Kesha.  She's just amazing.  (Also, she's from my hometown!  Woot woot!)

After I committed to doing something bright and colorful, I remembered this picture that Lisl posted from Coachella:


Super awesome, right?  I wanna go grab some glowsticks and do this to my hair right now!

Using the color scheme of Kesha's hair and the radiating shape of those glowsticks, here's what I came up with:


How I Did It: Started with a white base.  Then I applied tape (I used both striping tape and washi tape).  Then I applied all of the colors onto a makeup sponge, and sponged them on to each nail.  For my middle finger, I then applied more striping tape and painted white over it.


Colors Used:
Sally Hansen White On 
Sinful Colors Rise 'N Shine
Maybelline Color Show Shocking Seas
Color Club Hot Tub, Ringo, & Love Letter
Julep Korin and Bette

Bonus shots outside in the sun:


I just love the neons on these nails so much!!!  They really just scream "spring" to me.  I can't stop looking at them!  I hope they'd make Kesha proud.

Ocean Nails


Arden: All my kids at church have been on spring break for the last couple of weeks, and it's made me miss getting a spring break pretty bad!  Why can't they give you a mandatory week off work every spring?  There's just something about spring that makes you want to jet off to somewhere sandy and warm. 

My manicure today is inspired by this picture of the ocean I took at the beach a couple of years ago on spring break.  Isn't it beautiful?


I love how the ocean water changes from green to blue, so I created a manicure that did the same!


I worked on one nail at a time, and tried to apply each color while the previous color was still wet so they could swirl together a little.  (It's kinda hard to see this effect in the darker colors, but it come across pretty well with the lighter colors.)
 
Colors used (from dark to light):
Butter London Blue Coat
Color Club Blue Velvet
Butter London Blagger
Julep Diana
Essie Mint Candy Apple

I then added a top coat of Girly Bits Cosmic Ocean to give them that cool, glittery ocean look!

This post is part of a spring nail art competition Julep is holding; they are by far my favorite nail polish company, so you should definitely go check out their colors and consider getting some yourself!

Saturday, April 12, 2014

Casa de Polish Returns!

Arden: Hey everyone!  We're back!  Sorry for our long absence, but we're hoping to post regularly again now (in a little more simplified form).  Just so you know, even when we aren't updating the blog, we're always posting our manicures on our individual Instagram accounts, so you should follow us:

Arden: @arden_elise
Lisl: @slisl

Here are some of the manicures I've done recently:

Glitter sandwich using Julep Soraphine & Autumn, with dots of Julep Myriam, Majorie, Karen, & Helen.

Striping tape nails with Julep Roc Solid and Diamond Theory for St. Patrick's Day.

Neon dotted nails using Color Club Double Dare and Love Letter.

 Rainbow nails with a twist: sponged on a rainbow gradient, applied striping tape, painted over nails with black, and then removed the tape!  (Used wayyyy too many colors to list.)

Passion fruit tips with Julep Paige and Veronica.  (P.S. Veronica is an amaaazing color for spring!)

More dots using Julep Diana and Bette.  (I just keep being drawn to dots this spring!)

Bright sponged on colorful nails (again, too many colors to list!)

Blue sparkly chevrons with Julep Joanna, Tracy, & Jordan.  (P.S. Julep reposted these nails in a blog post about spring manis-- check it out here.  How cool is that?)

All right, that's it for now.  Will post again soon!

Monday, November 18, 2013

New Technique: Marbling without Water


Arden: Hey everyone!  Today's prompt in the 33 Day Challenge is to try out a technique that is new to you.  If I were a person who embraced adversity, this probably would've been the perfect opportunity to try out water marbling again.  But everytime I've ever tried to do water marble nails I've ended up wanting to bash my head into the wall.  I've just never gotten it to work.  So instead of suffering through the same crushing defeat again, I decided to try out this marbling without water technique by Robin Moses.

First, watch this tutorial video.  It is super great!


 I started by painting my nails with a base coat, and then two coats of OPI Don't Touch My Tutu (whenever I do nude nails, I always start with this polish, because I feel like it helps me work up to a nice opacity quicker).  Then I applied a very thick coat of Julep Layne (a more pinkish nude) to my first nail.

I dabbed on white (Julep Bunny), black (Sally Hansen Black Out), and sparkly tan (Julep Cynthia) polish and used a small nail art brush to swirl them together.  I will say that I don't think my nude coat was as wet/thick as the one in the video, because my colors did not swirl that well together.  When i try this again I will definitely try to make the base coat thicker.  But the polishes still swirled pretty well.

When I finished with each nail, I went back and dabbed on some gold glitter polish using my Color Club gold striper.  I added a top coat and voila!


Obviously, not as totally awesome as the original, but still pretty good!  I'm gonna call this new technique a success.  (And not nearly as maddening as water marbling.  Which I will try again someday.  Maybe.)


Be sure to check out the rest of entries in the 33DC below!

Monday, November 4, 2013

Ladybug Nail Tutorial


Arden: Hey everyone! Today's prompt in the 33 Day Challenge is to follow someone else's tutorial.  I chose to create these cute ladybug nails, following a tutorial from the blog Swatch and Learn.

And since I haven't done one of these in a while, I decided to create my own step by step tutorial as well!

I started by painting my nails with a base coat, then two coats of Julep Jackie (aka the best red polish ever).


As you can tell in the photo, I didn't get full coverage from two coats, but knew I was about to paint the tips black so I figured it would be fine.

After that, it was really easy.

1. Paint a black line with a striper brush to help mark the face of the ladybug.

2. Fill in the tip with a black polish (I used Sally Hansen Black Out).

3. Paint another black line down the center of your nail.

4. Add black dots on either side of the line using a dotting tool.

5. Add white dots at the tip using a dotting tool.

6. Add small black dots on top of the white to finish the eyes.  (This wasn't in the original tutorial, I just thought it would make the eyes cuter.)

Here's the finished product:


I love these little guys!  They're so cute!  And for a 100% freehanded design, these were pretty quick and easy!  Definitely a good manicure design for a beginner to try.

Let me know how you like them, and check out everyone else's entry in the 33DC today below.


Monday, October 28, 2013

South American Favela Painting Project Nails

 
Arden: Hi everyone!  Today we're supposed to create "South American" nails in the 33 Day Challenge.  Goodness gracious-- that's a whole continent of inspiration to choose from!  It was quite a difficult task.  I ultimately decided to use this picture for inspiration, created by an artist duo who've painted these awesome enormous mural on the walls of a favela in Rio de Janeiro.  To learn more about the Favela Painting project, click here.  (And if you're interested in how art has flourished in the slum favelas of Brazil, might I recommend the excellent documentary Favela Rising?)


I created these nails by painting the lighter shade of each color on every nail.  I then painted strokes of the darker color on top of each nail using the cloud/stairs method.  Next, I added white jagged lines using our Color Club white striper polish.  Finally, I made little black dots/lines for the windows on the buildings using the Color Club black striper polish.  I added a top coat and they were good to go!


Colors used (thumb to pinkie):
Sally Hansen Barracuda
Cover Girl Outlast Stay Brilliant glosstini Blue Hawaiian
Revlon Minted
OPI Did It On 'Em
CoverGirl Outlast Stay Brilliant Coral Silk
Essie Geranium
Sally Hansen Pink Blink
Essie Pink Daquiri
Julep Leila
Sally Hansen Butterscotch


Ok, so these are obviously not in any way a super realistic depiction of the favela murals, but they were bright and fun and geometric, so I still think we can call them a success.


As always, be sure to check out the other entries in today's 33 Day Challenge group after the break.

Friday, September 27, 2013

Striping Tape Multicolored Nails


Arden: Hey everyone!  Today's prompt in the 33 Day Challenge is "tape manicure."  I originally was going to do a manicure that involved regular Scotch tape, but then I saw this design on Pinterest and just had to try it out!

I started with one coat of L'Oreal All in One Base coat, and then painted two coats of Sally Hansen White Out.  I added a coat of Essie Good to Go to help my nails dry faster, and then applied striping tape in a random, vaguely spiderweb-like pattern.  I think I used 4-5 pieces of striping tape per nail.


I then cut up a makeup sponge into a bunch of little pieces (one for every color I would be using).  I took the first color I was going to use, dabbed a bit on a piece of junk mail (wax paper or aluminum foil also work well), dipped a piece of sponge in it, and sponged a tiny amount on each nail.  I repeated the process for each color.  When I was done, I removed the tape with tweezers and followed up with a top coat.


Colors used:
Sally Hansen Insta-Dri Pink Blink
CoverGirl Boundless Color Fuchsia Girl
Sally Hansen Insta-Dri Lightening
Essie Mint Candy Apple
Color Club London Calling
Essie Butler Please
Sally Hansen Xtreme Wear Lacey Lilac


I think these turned out AMAZING.  I freaking love them, they might be my most favorite nails I've ever done (I know I say that kind of a lot).  I just loved the sponged nature of the rainbow colors, and how crisp the tape lines look in comparison to the smudginess of the colors.


This was also not that difficult to do-- sponging on colors was great because if I messed up, I could just sponge something else on top of it and no one could tell.  The most time-consuming part of this manicure was applying all of the striping tape (as it always is with striping tape manicures).  The rest was super user-friendly!


What do you guys think of this manicure?  Let me know in the comments!

If you haven't entered our giveaway yet, you should do it!  You can see all the rules and prizes here.

a Rafflecopter giveaway

Also, be sure to check out all of the other people who are participating in the 33DC below!

Friday, August 2, 2013

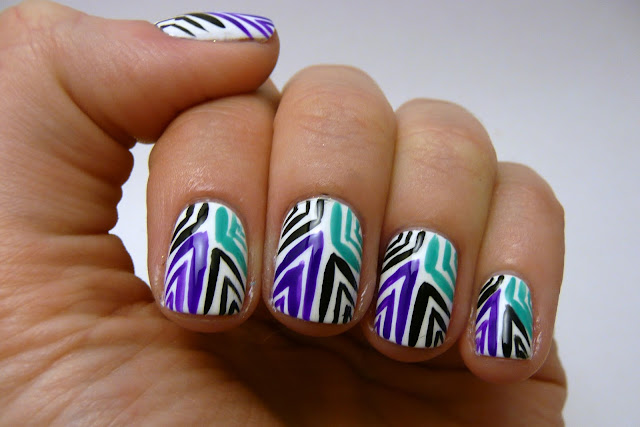
As Seen on Pinterest: Geometric Lines


 Arden: Hey everyone!  Here's another installment in my As Seen on Pinterest series!

First, the inspiration:

from: http://media-cache-ec0.pinimg.com/originals/ae/3a/77/ae3a7799bae0cdc8040a0f62c9c79c13.jpg
Those are pretty cool, right?  I saw them and had to try them out!

I started with a base of two coats of Julep Bunny.  (Let's be honest, I did this manicure right after I swatched Bunny, and that's why I used it!)


I followed the tutorial above.  I first added the top left section of black lines using our black Color Club striper polish.  Then I did the top right section using Julep Eden (I told you I'd already used it in a bunch of manicures!) and a striper brush from our MASH nail brush kit. 


Up until this point, things were going pretty well.  I was thinking, "These nails look awesome!  I am doing such a great job of making good-lucking, straight lines."

Then the wheels came off the wagon a little bit.  The third section I painted on was the teal quadrant, using L'Oreal Not a Cloud in Sight.  I don't know if it was just a problem with this polish, or if I was getting tired, or if I was just fated to stop making good lines, but this was a little bit of a problem.  It seemed like NONE of the lines were straight-- they all came across thick and goopy.  Alas.  I finished by adding the final black section, but by then I was a little demoralized and so those lines weren't very crisp either.


Now that I can look back with more perspective, I think as a whole these look pretty ok.  They're not the best (and certainly not as well-done as the original post from Pinterest) but I think as a whole they look pretty cool.


I'm going to have to try them again sometime and see if I can do better!

Wednesday, July 31, 2013

Readers' Nail Art


Hi everyone!  Today we're trying something different, and are going to show you some of our readers' nail art! 

A couple weeks ago our friends Kathy and Stephanie were over for girls' night, and we ended up all doing our nails together.  Kathy and Stephanie are readers of the blog, and decided to try out some of the nail techniques we've showcased before. We then made them take pictures of their nails so we could show them to you!

Here are Kathy's awesome polka dot nails!


The background color for these nails was Color Club London Calling and the dots were done using Essie Fear or Desire (at least, I assume that's what the orange was.  Kathy or Lisl, can you confirm?).

Look at what a great job Kathy did making those uniform dots!  That's not as easy as it looks, folks!


And here are Stephanie's gradient dots, done using the method from this post


The background color was OPI Goldfinger and I believe the red dots were made using Julep Jackie (again, I'm not 100% on that-- can you remember, Stephanie?). 


And now this is where you guys come in.  Have you tried any new nail art recently?  (I know from my Instagram that several of you have!)  If so, snap a picture and send it to us at casadepolish[at]gmail.com!  We'd love to feature more reader nail art in the future!